MS Word- Orientation, columns,dropcap, Tabs and formatting
Good Morning Boys
Today we are going to talk about Drop Cap, Page Orientation and Tab settings. We will also try apply formatting. All these options allow us to organize our work.
The Google meet link for today's class is:
-------------------------------------------------------------------------------------------------------
By the end of this session, you will be able to:
- Apply Page orientation to define the work area in a word document
- Apply decorative touch to the text that is usually seen in Print media- Drop Cap and divide in columns
- .Setting tabs and apply formatting in a selected document.
-------------------------------------------------------------------------------------------------------------------------
Change Page Orientation
The following steps will help you understand how to change the page orientation of a word document.
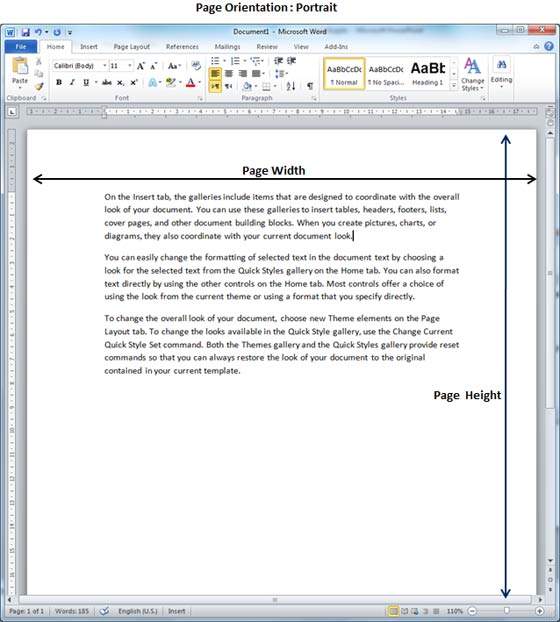
Step 1 − Open the Word document the orientation of which needs to be changed. By default, orientation will be Portrait Orientation as shown below.
 Step 2 − Click the Page Layout tab, and click the Orientation button available in the Page Setup group. This will display an Option Menu having both the options (Portrait & Landscape) to be selected.
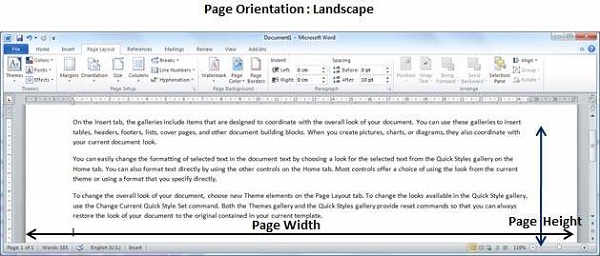
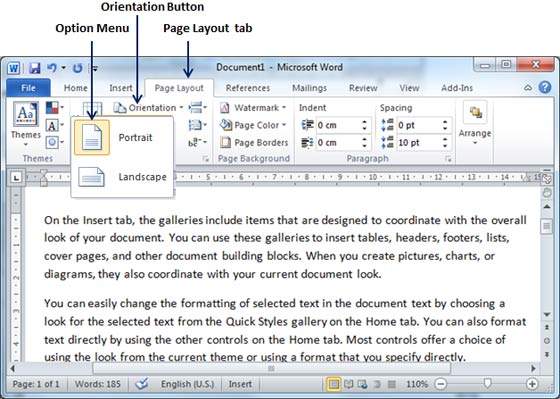 Step 3 − Click any of the options you want to set to orientation. Because our page is already in portrait orientation, we will click the Landscape option to change my orientation to landscape orientation.
The following steps will help you understand how to change the page orientation of a word document.
Step 1 − Open the Word document the orientation of which needs to be changed. By default, orientation will be Portrait Orientation as shown below.
Step 2 − Click the Page Layout tab, and click the Orientation button available in the Page Setup group. This will display an Option Menu having both the options (Portrait & Landscape) to be selected.
Step 3 − Click any of the options you want to set to orientation. Because our page is already in portrait orientation, we will click the Landscape option to change my orientation to landscape orientation.
Drop Cap
Drop caps are a decorative touch, done through typographical means, that you can apply to your document. Drop caps are traditionally done with the first letter of a chapter or some other major section of a document. To create drop caps, do the following:
- Type your paragraph as you normally would.
- Make sure the insertion point is somewhere within the paragraph.
- Display the Insert tab of the ribbon.
- In the Text group, click Drop Cap. Word displays some common options for drop caps.
- Choose Drop Cap Options. Word displays the Drop Cap dialog box. (See Figure 1.)
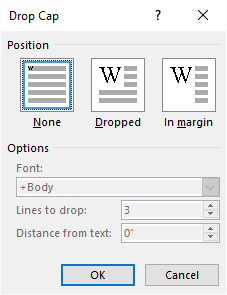 Figure 1. The Drop Cap dialog box.
- Chose the position for your drop cap, according to your preference.
- Change any other options to format your drop cap.
- Click on OK.
In this chapter, we will discuss page orientation in Word 2010. Page Orientation is useful when you print your pages. By default, Microsoft Word shows a page in portrait orientation and in this case the width of the page is less than the height of the page; the page will be 8.5 inches × 11 inches.
You can change the page orientation from portrait to landscape orientation. In such case, the width of the page will be more than the height of the page and page will be 11 inches × 8.5 inches.
-----------------------------------------------------------------------------------------------------------------------
Figure 1. The Drop Cap dialog box.
In this chapter, we will discuss page orientation in Word 2010. Page Orientation is useful when you print your pages. By default, Microsoft Word shows a page in portrait orientation and in this case the width of the page is less than the height of the page; the page will be 8.5 inches × 11 inches.
You can change the page orientation from portrait to landscape orientation. In such case, the width of the page will be more than the height of the page and page will be 11 inches × 8.5 inches.
-----------------------------------------------------------------------------------------------------------------------
Splitting Text into columns in MS Word:
You can split text into columns in Microsoft Word in just a few simple steps.
This feature works the same in all modern versions of Microsoft Word: 2010, 2013, and 2016.
- In the Layout tab, on the Page Setup group, click Columns.
- Click one of the options in the menu to select it or click More Columns to add more than three columns or columns with custom width and spacing.
- By default, changes to columns affect only the section in which you are working. To apply column changes to a whole document, click More Columns and then Apply to: Whole document.

-------------------------------------------------------------
Set Tabs in Word
In this chapter, we will discuss how to set tabs in Word 2010. Microsoft Word tabs help in setting up information properly within a column. Word enables you to set left, center, right, decimal, or bar tabs to line up columnar information. By default, Word places tabs every .5 inch across the page between the left and right margins.
| S.No | Tab & Description |
|---|---|
| 1 |
Left
Left-aligns text at tab stop and this is the default tab.
|
| 2 |
Center
Centers text over tab stop.
|
| 3 |
Right
Right-aligns text at tab stop.
|
| 4 |
Decimal
Aligns numbers at decimal point over tab stop.
|
| 5 |
Bar
Creates a bar to separate the text.
|
Setting a Tab
Following are the simple steps to set the center and the right tabs in a Word document. You can use similar steps but different tabs to set up decimal and bar tabs.
Step 1 − Type some text that you want to line up with the tab stops. Press the Tab key only once between each column of information you to want to line up. I typed the following three lines.
In this chapter, we will discuss how to set tabs in Word 2010. Microsoft Word tabs help in setting up information properly within a column. Word enables you to set left, center, right, decimal, or bar tabs to line up columnar information. By default, Word places tabs every .5 inch across the page between the left and right margins.
| S.No | Tab & Description |
|---|---|
| 1 |
Left
Left-aligns text at tab stop and this is the default tab.
|
| 2 |
Center
Centers text over tab stop.
|
| 3 |
Right
Right-aligns text at tab stop.
|
| 4 |
Decimal
Aligns numbers at decimal point over tab stop.
|
| 5 |
Bar
Creates a bar to separate the text.
|
Setting a Tab
Following are the simple steps to set the center and the right tabs in a Word document. You can use similar steps but different tabs to set up decimal and bar tabs.
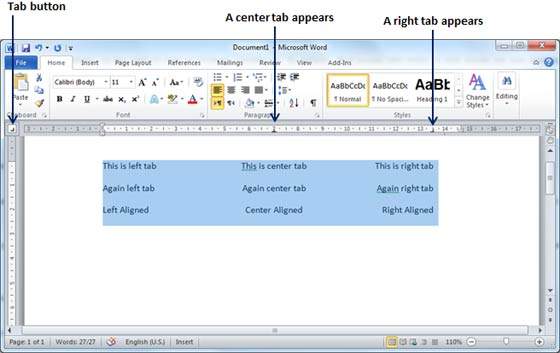
Step 1 − Type some text that you want to line up with the tab stops. Press the Tab key only once between each column of information you to want to line up. I typed the following three lines.
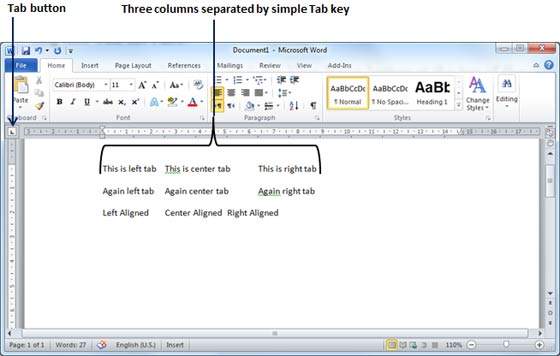
Step 2 − Select a tab type using the Tab button; assume the center tab and finally select the paragraph or paragraphs the tabs of which you want to set. Next click the ruler where you want the tab to appear, a tab will appear at the ruler where you just clicked and the selected portion of text will be adjusted in the center.
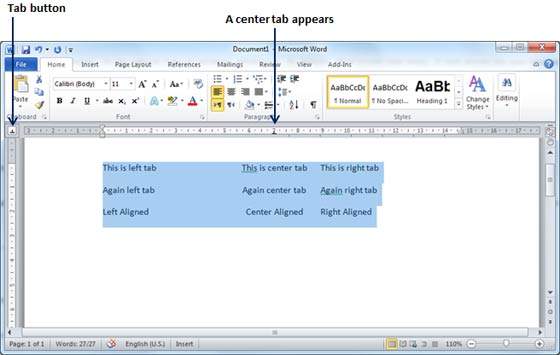
Step 3 − Now select the right tab using the Tab Button and click the ruler at the right side where you want to align the text at the right side. A right tab will appear at the ruler where you just clicked and the selected portion of text will be right-aligned.
Moving a Tab
You can move an already set tab at a particular location by following the steps given below.
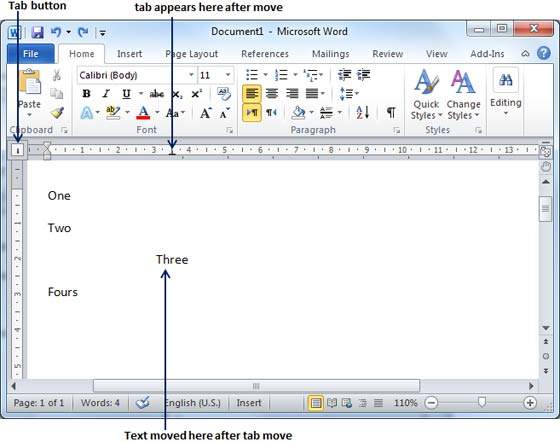
Step 1 − Click just before the line for which you want to change the tab setting. Drag the tab sign available at the ruler to the left or right.
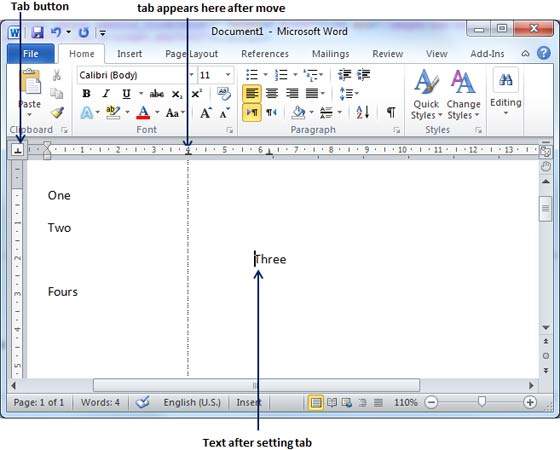
Step 2 − A vertical line marks its position as you drag and when you click and drag a tab, the text moves with the tab.
---------------------------------------------------------------------------------------------------------------------------------------
Apply Formatting in Word
In this chapter, we will discuss how to copy and apply formatting in Word 2010. If you already have a well formatted portion of text and you want to apply similar formatting to another portion of text, then Microsoft Word provides a feature to copy and apply a format from one portion of text to another portion of text. This is very useful and a time saving operation.
Copy and Apply of text formatting works for various text attributes; for example, text fonts, text colors, margins, headings, etc.
Copy and Apply Text Formatting
The following steps will help you understand how to copy and apply text formatting from one portion of text in your document to another portion of text in your document.
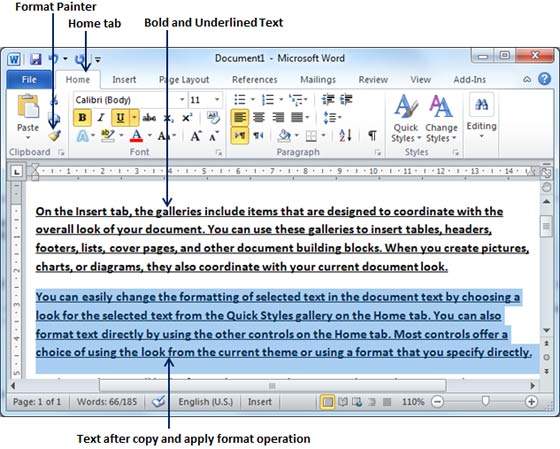
Step 1 − Select the portion of text containing the formatting that you want to copy. I have selected a text which has bold and underlined font as shown below.
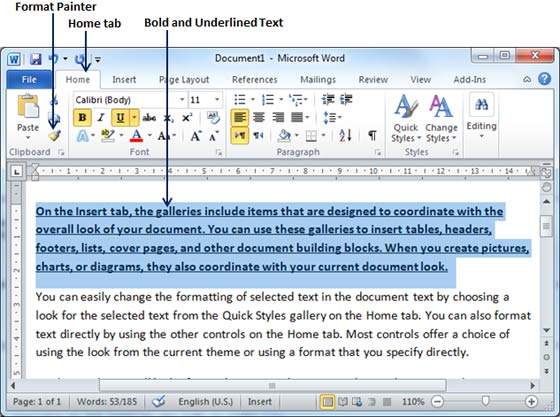
Step 2 − click the Home tab and click the Format Painter button to copy the format of the selected text. As soon as you click the format painter button, the mouse pointer changes to a paint brush when you move the mouse over your document.
Step 3 − Now you are ready to apply the copied text format to any of the selected text. So select a text using mouse where you want to apply the copied text format. While selecting a portion of text, you have to make sure that your mouse pointer is still in paint brush shape. After selecting the text, just release the right-click button of the mouse and you will see that newly selected text is changed to the format used for the original selection. You can click anywhere outside the selection to continue working on your document for further editing.
Copy and Apply Text Formatting multiple times
Step 1 − If you are intended to apply formatting at multiple places, then you will have to double-click the Format Painter button while copying the text format. Later on, you just keep selecting the text where you want to apply the text formatting.
Step 2 − When you are done with applying formatting at all the places, click Format Painter to come out of the format applying operation.


Good Morning Ma'am
ReplyDeletegood morning ma'am Wayne
ReplyDeleteGood Morning ma'am
ReplyDeleteVeer Pathania 9-G
good morning ma'am
ReplyDeleteishank
good afternoon ma'am
ReplyDeleteGood afternoon ma'am aayush
ReplyDeleteGood afternoon ma'am Wayne
ReplyDelete