Basic Operations - Operating System
Good Morning Boys
The Link for today's class (Both in first as well as third period is as follows):
Attendance for both classes is compulsory.
-----------------------------------------------------------------------------------------
By the end of this session, you will be able to
- Create a folder wherever you want
- Organize the contents within the folder
- Saving files in the folder
- Copy / Cut a file/folder to organize the data
- Understand the concept of a clipboard
- Understand the steps to delete a file/folder.
- Understand the restore command and its application.
- Familiarize yourself with the keyboard shortcut keys for important Windows functions.
- Understand the correct way and purpose of Shutting Down the computer
--------------------------------------------------------------------------------------------------------------------------
IMPORTANT OPERATIONS IN WINDOWS:
1. Creating a Folder
- Navigate to the location where you want to place the new folder.
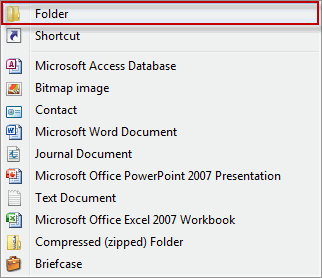
- Right-click and select New.

- Select Folder.

- The folder will be displayed, with the default name "New folder."

- To change the name, type the new name for the folder and then press Enter.

- Most of the time, we want to use a specific program to create a new file.
- For example, if we want to create a new Word document, we would simply open Word and it would display a new, blank document.
- Once the new file is created, we need to save it.
So, Steps to Create a New Folder in Windows
- Navigate to the location where you want to place the new folder.
- Right-click and select New .
- Select Folder .
- The folder will be displayed, with the default name "New folder."
- To change the name, type the new name for the folder and then press Enter .
2. Saving a New File
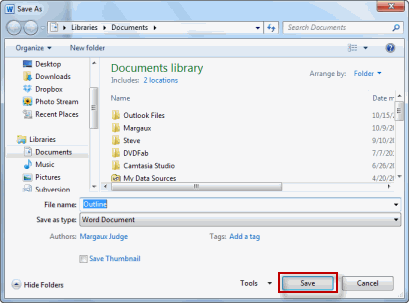
- Select the Save option.

- In the Save As dialog box, type a new file name for your file.

- Click Save.

3. RENAME A FOLDER IN WINDOWS
Method 1:
- Right-click on the folder whose name you want to change, and choose "Rename"
- Windows 7 will make the folder name editable text
- Type the new folder name, and hit Enter to accept it
Method 2:
- Another way is to use the F2 keyboard shortcut when the folder is selected
- Here too, type another name for the folder or subfolder, and hit Enter to rename it
4.Copying and moving files and folders
Windows 7 provides two basic methods for copying files and folders from one disk to another or from one folder to another on the same disk:
With CUT-PASTE(MOVING)- The file/ folder is removed from the original position and moved to a new destination.
With COPY-PASTE(COPYING)- A copy of the file/folder is created. The original remains in its place,while the copy can be moved to desired destination.
NOTE-
1. Windows has a temporary storage area called the CLIPBOARD where all the files /folders that are CUT or COPIED are saved temporarily before we paste them at the desired destination.
2. We can perform the cut, copy, and paste commands by selecting the Cut, Copy, and Paste commands on the Organize button on the Explorer window's toolbar, or by using standard Ctrl+X (cut), Ctrl+C (copy), and Ctrl+V (paste) keyboard shortcuts.
3. If the Classic menus are displayed in the Explorer window, you can also access the Cut, Copy, and Paste commands by choosing
Edit → Cut,
Edit → Copy, and
Edit → Paste respectively
from the source and destination Explorer window's drop-down menus.
If not, you can press
Ctrl+X to cut,
Ctrl+C to copy, and
Ctrl+V to paste.
- Drag and drop: You select items in one open Explorer window and then drag them to another open Explorer window (on the same or different disk), where you drop them into place.
- Cut and paste: You copy or cut selected items to the Windows Clipboard and then paste them into another folder (on the same or different disk).
Using the drag-and-drop method
The technique of moving files and folders with the drag-and-drop method is really straightforward:
- Open two separate Explorer windows
- arrange them on the Windows 7 desktop with as little overlap as possible:
- the first is the source Explorer window that contains the item(s) you want to move, and
- the second is the destination Explorer window where these items are to be moved.
- Select the item(s) you want to move in the first source Explorer window.
- While continuing to hold down the mouse button, drag the folder/document icon representing the selected items (and showing the number of items selected) to the destination Explorer window.
- When you've positioned the icon somewhere within the destination Explorer window, release the mouse button to drop the items there.
- They then appear in the destination window in the order (usually alphabetical by filename) that that Explorer window currently uses.
Using the cut-and-paste method
To move or copy files by cutting and pasting (using either method), follow these steps:
- Open the folder with Windows Explorer (Documents, Computer, or Network) that holds the subfolders or files that you're moving or copying.
- Select all the items to be copied and then either press Ctrl+C (or choose Copy from the Organize button's drop-down menu) or press Ctrl+X (or choose Cut from the Organize button's drop-down menu).
- Use the Navigation pane in the Explorer window to open the destination folder (that is, the one into which you're moving or copying the selected folder or file items).
Don't forget to click the Folders button in the Navigation pane to display the hierarchy of components and folders on your computer. - Press Ctrl+V (or choose Paste from the Organize button's drop-down menu) to paste the items into the destination folder.
4. To delete a computer file or folder:
- In Windows Explorer, right-click the file or folder that you want to delete and then choose Delete. ...
- Click Yes to delete the file.
NOTE:
- Windows periodically purges(deletes) older files from the Recycle Bin, but if you change your mind about a file or folder you deleted, you may still be able to retrieve them.
- To try to restore a deleted file or folder,
- double-click the Recycle Bin icon on the desktop.
- Right-click the file or folder and choose Restore.
- Windows restores the file to wherever it was when you deleted it.
- If we want to permanently delete a specific file or a folder without sending it to the recycle bin,
- we must press SHIFT and Del together.
- This method is followed when we are sure that we don't need the file or the folder.
- It must be noted that a file/folder deleted using SHIFT+Del can not be retrieved.
5. SHUT DOWN the computer
- Shutting down a computer closes all the programs that are open
- Exits the operating system safely so
- hardware isn't damaged and
- your operating system isn't corrupted.
Methods:
- Press the Windows key on the keyboard, or click Start.
- The Start menu opens.
- In the Start menu, click Power, then click Shut down.
-or-
Press
Ctrl+Alt+Del and click the power button in the bottom-right corner of the
screen.
-or-
From the
Windows desktop, press Alt+F4 to get the Shut Down Windows screen shown here.
EXERCISE
- Write steps to do the following:
- Create a new folder
- Rename a folder
- Save a new word file in a folder by the name of IXG
- Delete a file named MATHS from a folder called IXG
- Differentiate between COPY-PASTE and CUT-PASTE
- Write the keyboard shortcut keys for
- Cut
- Copy
- Paste

Good Morning Ma'am
ReplyDeleteGood Morning. At 7:30am pls join the google meet class at the given link
ReplyDeletegood morning ma'am
ReplyDeleteishank batra
Good morning ma'am aayush 9G
ReplyDeleteGood morning ma'am
ReplyDeleteVeer Pathania
Good morning ma'am Wayne
ReplyDeleteGood morning
ReplyDeletema'am
Congratulations Sankar and veer
ReplyDeleteThank You Ma'am
DeleteCongratulations wayne
ReplyDelete